Getting Started
ESOP Expensing.
Done in Minutes.
Upload your ESOP report, set the parameters, download a complete audit-ready Excel package. This guide walks through every step.

60-second overview. Click to play. Or watch on YouTube.
1
Step 1
Add a Company
Each company you manage is a separate entity in Vest. All data is isolated per company.
-
1Log in at app.get-vest.com. On first login you'll be prompted to create your first company.
-
2Enter the company name and click Create Company.
-
3From the dashboard, click Quick Expensing in the left sidebar to begin.
Managing multiple companies?
Go to the Admin Portal to switch between companies or add a new one. Each company's data is fully isolated.
2
Step 2
Upload the ESOP Report
Upload the ESOP report (from your trustee or any other provider). Vest reads the file and pulls out every grant: employee names, grant dates, option quantities, exercise prices, vesting schedules, and termination dates.
-
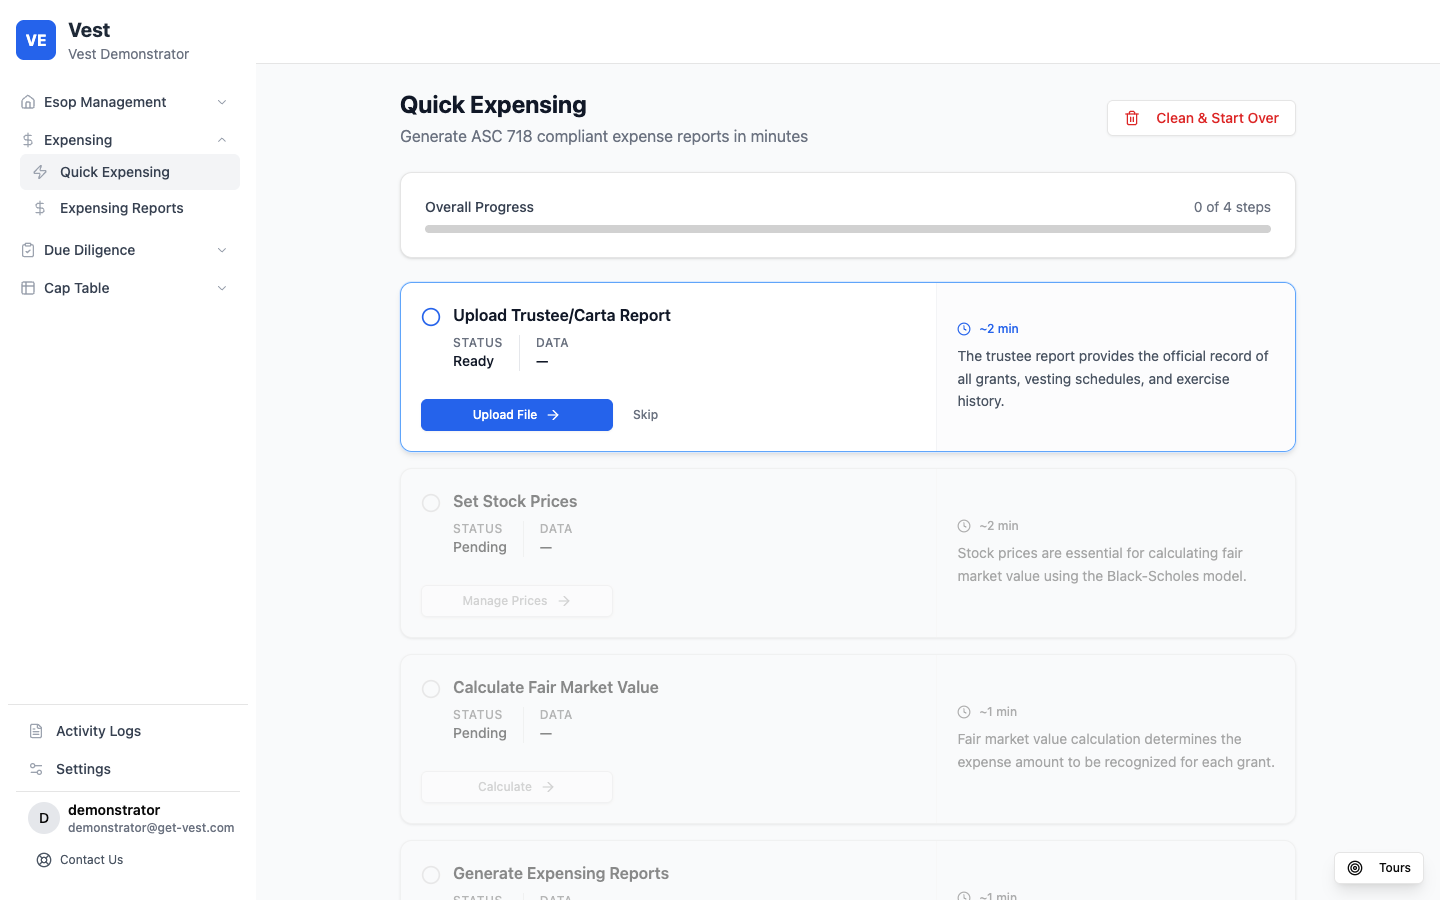
1In the Quick Expensing wizard, click Upload Trustee Report.
-
2Select your trustee type and upload the file. Vest accepts
.csv,.xlsx, and.xls. -
3Review the extracted grants table. All fields are editable inline. Fields with missing required values are highlighted in red - correct any errors before approving.
-
4Click Approve & Create Grants. Vest processes employees, vesting schedules, exercises, and terminations automatically.
Before you upload
- Termination dates: Include a termination date for every employee who has left. Missing dates affect expense calculations.
- Departments: Department names are optional. Employees without a department are included in the total expense figures and shown in the report as "No Department". You can add departments directly in the grants table before approving.
Troubleshooting
Password-protected Excel file
Vest cannot open password-protected files. Remove the password in Excel first:
- Open the file in Excel
- Go to File → Info → Protect Workbook → Encrypt with Password
- Delete the password and save
- Re-upload the unprotected file
Grants flagged for Manual Vesting Schedule
When Vest cannot determine the vesting schedule from the ESOP report (for example, custom schedules for advisors or non-standard cliff arrangements), those grants are flagged in red as Manual Vesting Schedule Required.
The wizard will direct you to the Manual Review page. Click the link in the dialog to open the grant and define vesting events manually. Once all flagged grants are resolved, return to Quick Expensing to continue.
Other missing required fields (such as grant date or quantity) are also highlighted in red in the grants table. Fix them inline before approving.
Missing or wrong department names
Department names in the ESOP report group employees in the expensing reports. If a department name is missing, that employee will be imported without a department and shown as "No Department" in the report. They will still be included in the total expense figures.
To assign departments, edit them directly in the grants table before approving. To avoid inconsistent groupings (e.g. "R&D" vs "Research & Development"), standardize names in the file before uploading.
Terminated employees not recognized
Termination dates in the ESOP file trigger Vest's termination processor, which cancels unvested options and records the correct end date for expense calculation.
If termination dates are missing or wrong in the file, edit them in the grants table before approving.
Need to start over?
Use the Clean & Start Over button at the top of the Quick Expensing page (next to the progress bar). This clears all uploaded data and resets all progress for that company, so you can re-upload from scratch.
3
Step 3
Set Stock Prices
Stock prices feed into the Black-Scholes FMV calculation. Each grant is matched to the most recent price with an effective date on or before the grant date. You only need to add one entry per valuation event, not one per grant.
-
1In the Quick Expensing wizard, click Set Stock Prices (or go to Company Settings → Share Prices).
-
2Click Add Price. Enter the share price, effective date, and optionally an event type (Initial Price, Funding Round, Board Resolution, 409A Valuation, etc.).
-
3Add one entry for each valuation event. Vest applies each price to grants whose grant date falls within that period.
-
4You can also import all price entries from Excel at once using the Import option. Click Save when done.
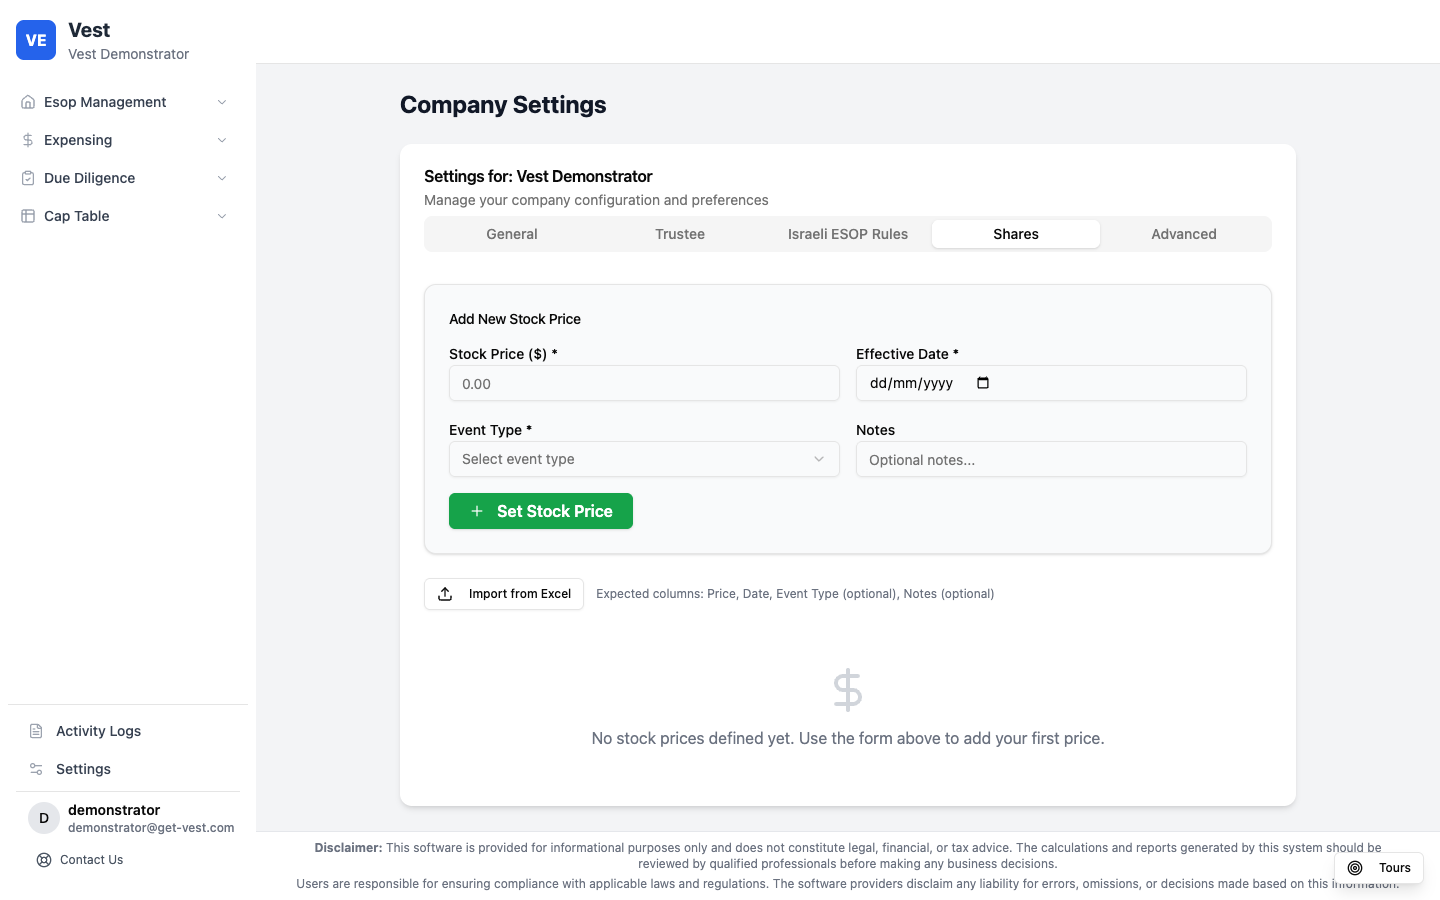
Share price manager. Add one entry per valuation event.
4
Step 4
Calculate Fair Market Value
Vest calculates the Fair Market Value (FMV) for each grant using the Black-Scholes model. The risk-free rate is fetched automatically from the U.S. Federal Reserve, matched to each grant's expected term. You fill in the company-specific assumptions.
-
1Navigate to Expensing Reports → Set Fair Values.
-
2Review the Black-Scholes parameters and edit if needed:
Risk-Free Rate Fetched automatically from the Federal Reserve, matched to each grant's expected term. You can override manually. Volatility Expected volatility (%). For private companies, typically derived from peer company analysis. Dividend yield Typically 0% for early-stage companies. Forfeiture rate Applies an expected employee departure rate to reduce the total expense. -
3Click Calculate Fair Values. Vest runs the Black-Scholes model for every grant and displays the results.
-
4Review the results table. You can override any individual grant if needed.
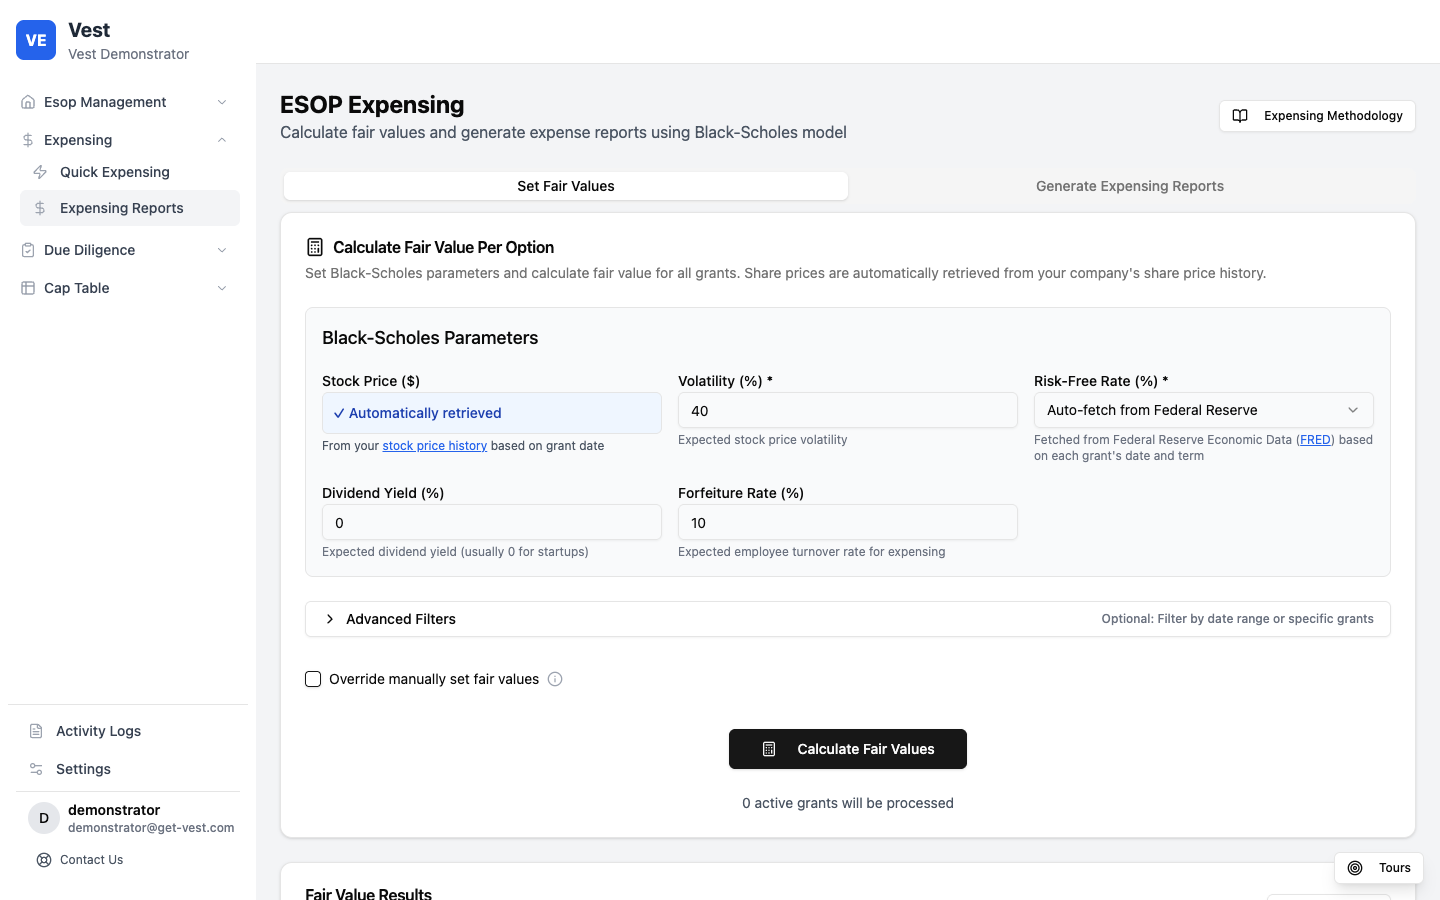
FMV parameters. The risk-free rate is fetched automatically from the Federal Reserve.
Methodology: SAB 107 Simplified Method
Vest calculates FMV and expense recognition using the SAB 107 Simplified Method. The full methodology document is available from the top-right corner of the Expensing Reports page. We recommend downloading and saving a copy to your client file.
5
Step 5
Generate the Expensing Report
Once fair values are calculated, a green Generate Expense Reports button appears at the top of the page. Clicking it opens the Generate Expensing Reports tab where you choose two settings before Vest runs the report.
Expense Recognition Method
Method A
Straight-Line
Total grant expense is spread evenly across the full vesting period. Common under ASC 718 (US GAAP) and permitted under IFRS 2 for grants with cliff + linear vesting.
Method B
Graded Vesting
Each vesting tranche is treated as a separate award and expensed over its own period. Results in front-loaded expense. Required under IFRS 2 for graded vesting awards.
Expense Start Date
Default
Grant Date
Expense spreads from the grant date. This is the standard ASC 718 treatment and the default for all companies.
Policy election
Vesting Start Date
Expense spreads from the vesting start date. For retroactive grants (VSD before grant date), Vest posts a single catch-up entry at the grant date, then continues monthly. Confirm with your auditor before enabling.
-
1On the Set Fair Values page, click the green Generate Expense Reports button.
-
2Under Expense Recognition Method, select Straight-Line or Graded Vesting.
-
3Under Expense Start Date, select Grant Date (default) or Vesting Start Date. Leave on Grant Date unless your auditor has confirmed the VSD policy.
-
4Set the date range for the report, or clear the date to generate the full future expensing outlook.
-
5Click Generate Reports. Vest switches to the report tab and runs the calculation.
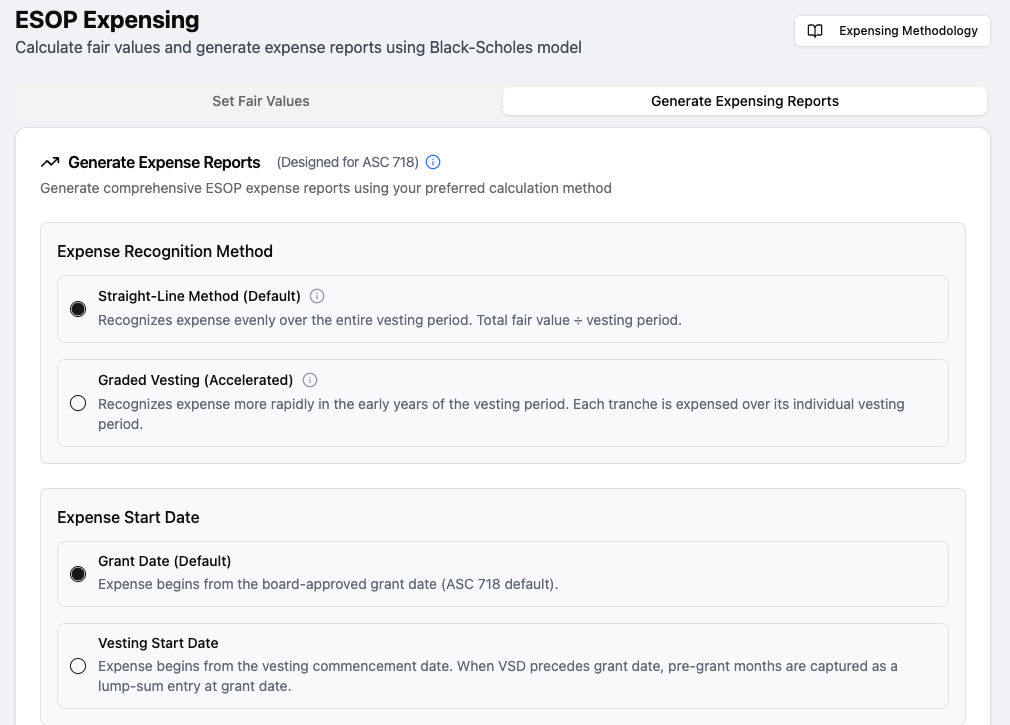
Both settings are on the Generate Expensing Reports tab. Expense Start Date defaults to Grant Date.
Which method to use?
The right choice depends on the company's accounting policy and what their auditor expects. If you're not sure, check with the company's CFO or auditor before generating.
6
Step 6
Review & Download Reports
Vest produces a complete Excel workbook covering every aspect of the expense calculation, from inputs to monthly schedules. Download it from the report page and hand it directly to the auditor.
What's in the Excel file
1
Parameters
Company assumptions, Black-Scholes inputs, stock price history, expense start date basis
2
Grant & FMV Summary
All grants with Black-Scholes inputs and computed FMV per grant
3
BS Calculations
Full Black-Scholes audit trail: d1, d2, Federal Reserve rate details
4
Annual Summary
Yearly expense by grant
5
Comprehensive Report
Per-year: opening balance, expense, adjustments, closing balance, vested, exercised, cancelled
6
Termination Details
Only included if terminated grants exist. Shows reversal entries.
7
Company Summary
Net expense and cumulative totals by year across all grants
8
Department Summary
Expense grouped by department and year
9
Expense Schedule
Grant-level monthly expense schedule for the full vesting term
10
Disclaimer
Methodology notes and limitations
Re-running the report
You can generate the report as many times as needed: for different date ranges, methods, or after updating grants. Each run overwrites the previous result in the UI, but you can download the Excel at any point.
Understanding the "Vested" column
In the Comprehensive Report tab, the Vested column shows the cumulative number of options that have vested in that year, including options that have already been exercised.
The Unvested column shows outstanding options that have not yet vested as of year-end.
Manual vesting schedule required: what it means
If one or more grants show a Manual Vesting Schedule Required blocking dialog, Vest could not determine the vesting schedule from the trustee data. This is common for:
- Advisor grants with non-standard schedules
- Grants where the ESOP report uses an unsupported vesting format
- One-time or milestone-based vesting
The wizard will direct you to the Manual Review page. Click the link in the dialog, define the vesting events for the flagged grant, then return to Quick Expensing. The wizard detects completion automatically and lets you continue.
Need help?
We're here for you
Questions about your first run? Reach us directly. We're happy to walk through it with you.